Rear
30-40 psi
Rear
30-40 psi
Rear
35-40psi
NCMCC Tech Topic:
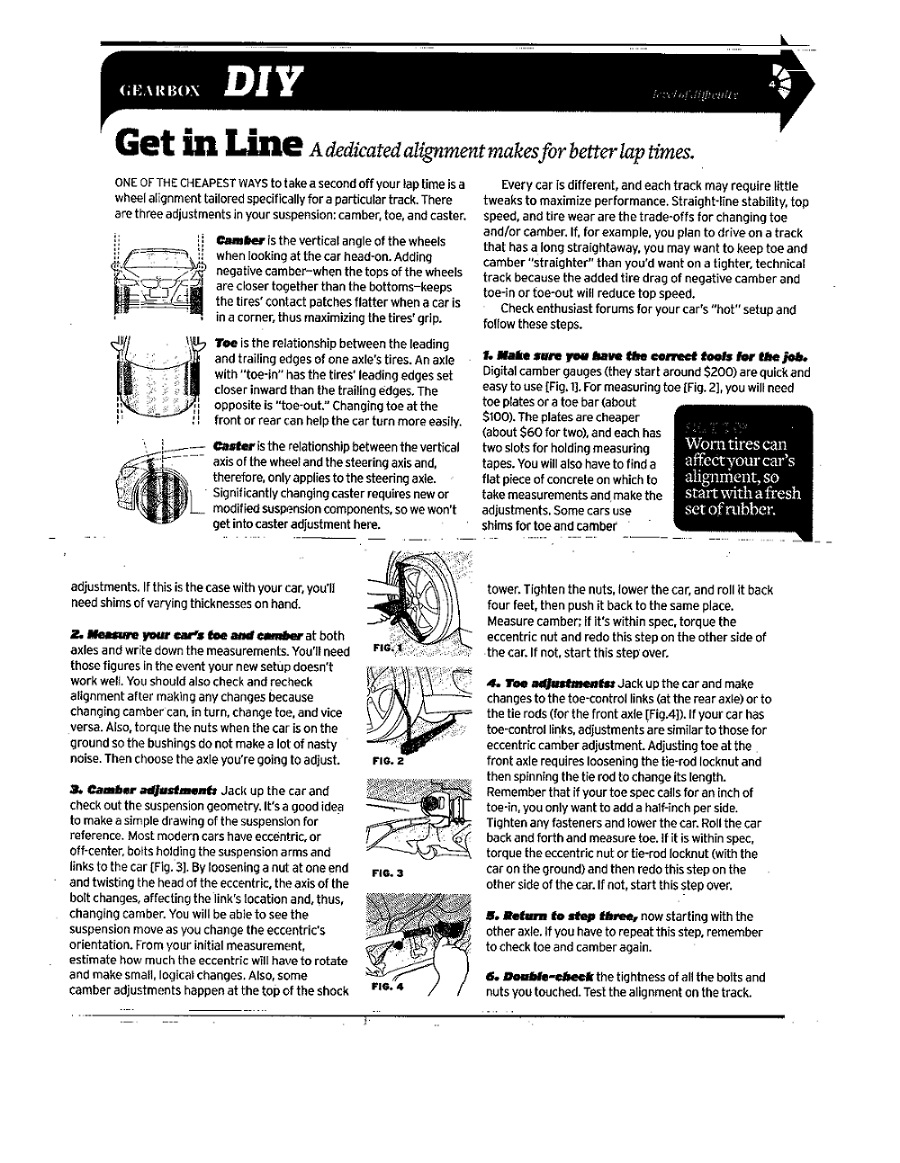
Autocross Car Handling & Set Up Basics
Tire pressures will make the most dramatic change for an occasional auto-x event
with a mustang. With a stock Mustang start with the tire pressures at 40 in
the front and 35 in the rear. The higher pressures will force a higher spring
rate and will help with the front end push that is notorious with a mustang.
Tire pressures are the most cost effective change that an occasional auto-crosser
can do. Most of the changes listed below are far beyond (cost and time) what
most members will be willing to do.
Disclaimer: You should only test handling
changes in a safe, closed area. Don't make mechanical changes unless you are
sure they will work. Always check your work to make sure everything is tightened.
Read the rest of the disclaimers.
Definitions: Study these so you know what we're talking about.
Understeer = Also called push or plowing. This means your car goes doesn't
turn where you point the wheel and you have to use more steering input to get
the car to turn. The car wants to go straight ahead. This means the front tires
are losing traction. A car can have oversteer entering a corner under braking,
in the corner with or without throttle input and exiting a corner under acceleration.
It is the opinion of most racers that Understeer is safer
but it is also slower.
Oversteer = Also called loose. When you have oversteer, the rear end wants to step out or even slid out from behind. This can happen when exiting a corner or even when entering a corner under braking. When the car kicks out during braking or when letting up on the gas pedal, this is also called trail throttle oversteer or trail braking. While this happens the most in rear engine or mid-engine cars, it can also happen in short wheel base front-engine cars with good balance. Trail throttle oversteer is a helpful thing to learn because it will "rotate" the car around tight corners. But it's hard to learn and requires a lot of practice. The difference between executing a nice rotation and spinning the car is a very small envelope. Excessive Oversteer can be dangerous, but it usually considered faster by most racers.
Neutral Set-up = A car that is totally neutral can be a thing of beauty to drive and is what we should all be striving to achieve. It means the car will 4 wheel drift through a corner without oversteer or understeer. Not that 4-wheel drifting is the fastest way around the track, because its not. Neutral means your car will neither push or be loose.
Rule #1: Benchmark your car before making changes. A good place to work on your cars set-up is during an autocross event. This way you can make the changes and see if you improved your times. Another way is to use a G-tech or similar instrument to measure the G-forces. The least effective way is to make changes based on the seat of your pants. Because what "feels" fast is often not the fastest way around a course.
Rule #2: Only make one change at a time. I know this is hard to do, but you have to discipline yourself into only changing one thing at a time before trying something else. Why is this important? For one, your changes may negate one another. Second, the only way you're going to know what works the best on your car is to try each adjustment and see how much it helps or hurts without anything else changing.
Rule #3: Keep a good log book. If you're serious about your handling, you will be trying many different things that will be hard to keep track of.
Rule #4: Every action will have the opposite reaction. For instance, if your car pushes during slow speed corners and you make a change to decrease this push, you will increase your over-steer by an equal amount. However, you may never notice the opposite change because it makes your car more neutral.
Rule #5: Use the following chart to change the handling of your car.
Try the easiest things first. Like tire pressure or ride height.
Autocross Basics
If you own or drive a Mustang speed is in your blood. For that matter, it's probably hardwired into your DNA, so it's only natural for us to want adrenaline-infused driving. So to get your fix without risking a ticket (or worse), you are looking into autocross.
Don't let being new to autocross overwhelm you! Every driver had a first day and a novice season. Autocrossing is a skill that requires instruction and practice to see improvements. If it was easy, it wouldn't be so competitive, or so fun. The great thing about this sport, though, is that even when you're going "slow", it's still fun driving. The course may seem "busy" at first, because it's tighter than what you see on the street, and you're trying to attack it faster than you could in traffic. You'll have fun learning the sport and learning to keep the car in control as you get faster and better with more seat-time.
The autocross at RMMR is put on by the Pikes Peak Sports Car Club and they do a really excellent job. A few weeks prior to RMMR, PPSCC does a warm up event. You can go to www.ppscc.net to see more. If you’ve not autocrossed before going to the warm up is highly recommended. It will be a smaller event than RMMR, there will be other new drivers there, and you can get a good feel for how things work and get your first driving experience. Then when you go to RMMR both you and your car will have some runs under your belt.
What to Bring to an Event
This list covers everything from sunscreen to snacks to tires pressure gauges.
You will probably come up with your own list of things you need at an autocross
event, but this will get you started:
• Your car (although you may share a car with someone else)
• Your entry fee
• A valid driver's license
• A safety helmet that meets the event requirements (usually Snell 95)
• Extra air in your tires. Stop at a gas station and fill your tires to
approximately 45psi-Front/35psi-Rear for a front-wheel-drive car, or 40psi all
around for a rear-wheel-drive car.
• Suitable shoes for driving. The best are light-soled, with a narrow
sole which does not stick out past the side of the foot
• Sunglasses
• Sunscreen
• Clothes appropriate for the weather forecast, plus a change for when
the forecast is wrong.
• Rain gear / umbrella
• A hat
• A folding chair
• Thermos of water or other non alcoholic beverage
• Cooler for lunch or snacks
• Windex and paper towels
• A pad and pencil to write down all the advice you'll get
• A good tire pressure gauge
• A portable air tank or compressor
• Chalk or white shoe polish to mark the tires
• Some basic tools
• Number/letter sets or white shoe polish for marking your car number
& class (sometimes the event will provide this)
Tech Inspection
Your car must pass tech inspection before you can compete. Tech Inspection Requirements:
• Safety Helmet: If you bring your own safety helmet, it must be approved
by Snell in the current or two most recent ratings (e.g. if Snell 95 is in production
then that, 90 and 85 are legal). The club provides loaner helmets for people
who do not have one.
• Safety Belts: Original safety belts, at a minimum are required. Shoulder
belts are not required, if your car did not come with them, but you must have
a lap belt. Belts must be firmly attached.
• Solidly Mounted Battery: The battery must be held down properly. If
it can be moved at all, it will not pass. There are some additional battery
requirements which may affect you if you have modified your car. The Tech Inspector
will help you out with them.
• Legal Tires: In Stock and Street Prepared categories, the tires must
have measurable tread, and must be in good condition. Excessive weather checks
or visible cord/plies will fail inspection. Tire pressures should be higher
than used for the street, usually 45psi-Front/35psi-Rear for a front-wheel-drive
car, or 40psi all around for a rear-wheel-drive car.
• Brakes: The brake pedal must be firm, with no loss of pressure when
held down.
• Steering / Suspension: The steering must be tight, with no excessive
play. Wheel bearings cannot have excessive play.
• Hub Caps and Trim Rings: Hub caps, trim rings and wheel covers must
be removed for competition, unless they are bolted to the wheel.
• Loose Items in Car: All loose items must be removed from the passenger
compartment and trunk. This includes the floor-mats. You may remove the spare
tire and jack, but you are not required to if they are properly secured.
• Fluid Leaks: Excessive fluid leaks will not pass inspection.
• Numbers and Class Markings: The car numbers and class markings should
be prominently displayed on both sides of the car in colors that contrast with
the paint, and should be large enough to be seen easily from the timing van.
White shoe polish for marking windows (comes off with Windex ) is available
for people who don't have magnetic or paper numbers.
• Adequate Muffler: Your car must be quieter than 95dbA (RLS) measured
50 feet from the course at a place where you are under full throttle. Due to
the possibility of losing sites for noise problems, this rule is strictly enforced.
(If your car is quiet enough to avoid attracting Police attention, it will most
likely pass the noise requirement)
• Throttle: Accelerator pedal must have a return spring and operate freely.
• Front Wheel Bearings/Rear Axle Play: Some events (including RMMR) check
for excess play in the Front Wheel Bearings and Rear Axles. They do the old
“shake test”
• Spare Tire/Trunk Contents: Some events require you empty your trunk,
some allow you to carry only a spare tire, jack and tire iron (for extra weight)
if securely fastened.
Course Walking
After tech, you will have time to walk the course. Before you go, read the chapter
on course-walking tips. Course maps are available at registration, and the Novice
chief will take you on a guided walk after the drivers' meeting. Try to have
the course memorized before you go on the guided walk. The course walk may be
before or after the drivers meeting so make sure you verify when it is so you
don’t miss it.
Drivers' Meeting
The drivers' meeting is mandatory for all drivers. The event chair will hold
the meeting approximately one half hour before the first car starts. Be sure
to attend. This is where you will find out information you'll need to know about
the course conditions, number of runs, particular safety concerns, how penalties
are assessed, and how work assignments will be handled.
Your Work Assignments
It takes a lot of people to manage an autocross event and most events require
participants to do corner work, course work or paddock work during the event.
You may get your work assignment with your registration materials (RMMR) or
get it at the event before or after the driver’s meeting (Pike Peak Club
events) It's best to report for your work assignment as quickly as possible
when it is time for you to work. Otherwise, some people end up working longer
than others, which is no fun.
Do's
• Report to work promptly.
• Make sure your station has adequate supplies; extra pylons, fire extinguisher,
radio and red flag.
• Know your area of responsibility and station number.
• Make sure cones are in their proper place when you get to your station,
and check them periodically during your shift.
• Understand the pylon rules (Section 7.9 A, B &C in the rule book)
e.g., pointer cones do not count if hit (see below), and a car is off-course
(DNF for Did Not Finish) if they pass on the wrong side of a cone.
• Pay attention to cars on course for accurate cone counts and your safety.
It is best to watch the back of the car and the cones themselves to see the
wobbling cone which may have left the box.
• Always be aware of where cars are on course
• Replace cones as soon as possible, another car will be coming through
in as soon as 30 seconds.
• Be prepared for exposure to sun/rain, wind, heat/cold while on station
• If assigned to a flag, keep it in your hand, unfurled (but not flapping)
ready for immediate deployment.
• Stay alert for unexpected pedestrians and vehicles
Don'ts
• Do not use cameras while on station.
• Do not sit down and do not wander away from your post.
• Do not turn your back on cars on course. Safety First!
• Do not red flag a car unless instructed to do so by the radio person
or if it is an emergency. However, if in doubt, err on the side of safety!
• Do not litter
• Do not pick up hot parts dropped on course because of risk of burns.
Your Runs
• You will usually have three or four timed runs, weather permitting. Depending on the event, you may get as many as five timed runs.
• Gridding and staging is managed in various ways at different events. Some events (RMMR) assigns you a grid number and you park your car in that grid position prior to the start of the runs. Once you make your first run you may not make subsequent runs in the exact same position due to re-runs and people pulling out of line to change drivers or make adjustment. Other events may grid cars by class or even randomly. If not explained at the driver’s meeting-ask!
• Once you are in grid, you will wait for the cars in front of you to launch, and you will move up toward the start line. The starter will motion you up and stop you in the starting position. The starter will wave a green flag when it is OK for you to start. The green flag means go as soon as you are ready, the timer will not start until you pass through the lights. Don't take too long if they are running two cars on course at once, because your start is timed to make sure you do not get too near the car already on course.
• If you do get "lost" on course, take the time to orient yourself and continue. Don't head back to the start line, because you may be pointed toward another car. Just take the time to get back on course, and continue the run as a practice! If the next driver catches up, they will be red-flagged and be granted a re-run (which they'll use to its fullest potential).
• Times are posted after each run. Your fastest run of the day is used to determine your finishing position.
Your Driving
Start out with some basic goals:
• Your goal is to have fun! That's why everyone is there.
• Your goal for the first run is to avoid getting lost on course (see
course-walking tips)
• Your goal for the rest of the day is to improve your time on each run
• Your goal for the second event is the same as the first.
• Your goal for the rest of the season is to beat somebody (anybody!)
and continue to make each run faster than the last.
A few pointers:
• Position first, then speed. Positioning the car perfectly is more important
than trying to attain the highest potential speed. For example, you will drop
more time by correctly positioning the car nearer to slalom cones than you will
by adding 1 or 2 MPH in speed. Same with sweepers (tight line). Same with 90-degree
turns (use all of the track). Also, position is a prerequisite for speed. If
you are not in the correct place, you will not be able go faster. Or at least
not for very long!
• Brake earlier...and less. Waiting until the last possible second approaching
a turn and then dropping anchor at precisely the correct place so that the desired
entry speed is reached exactly as you come to the turn-in point is quite difficult
to execute consistently. Especially when you consider that you get no practice
runs on the course, and the surface changes on every run, and you aren't likely
to be in exactly the same position with the same approach speed on every run,
etc. Better to start braking a little earlier to give some margin of error.
And by braking less you can either add or subtract braking effort as you close
in on the turn-in point. This will make you consistent and smooth.
• Lift early instead of braking later. Continuing with the philosophy
of #3, when you need to reduce speed only a moderate amount, try an early lift
of the throttle instead of a later push of the brake. This is less upsetting
to the car, is easier to do and thus more consistent, and allows for more precise
placement entering the maneuver (remember #1 above).
• Use a “late apex” line. Generally, most corners including
slaloms should be driven with a "late apex" line. As you pass the
apex, you should already be as close to full throttle as the course will allow.
This can also be explained as entering a turn “wide” and coming
out “tight”. This technique gives you more room to correct errors
coming out of turns. You can get a real good example of a "late apex"
line if you ask an experienced driver to explain it to you while you are walking
the track.
• It’s easier to add speed in a turn than to get rid of it. If you
are under the limit, a slight push of the right foot will get you more speed
with no additional side effects. On the other hand, if you are too fast and
the tires have begun slipping, you can only reduce throttle and wait until the
tires turn enough of that excess energy into smoke and heat. Don't use your
tires as brakes!
• Unwind the wheel, then add power. If the car is using all of the tire's
tractive capacity to corner, there is none left for additional acceleration.
At corner exit, as you unwind the wheel, you make some available. If you do
not unwind the wheel, the tire will start to slide and the car will push out
(see #6 above).
• Use your right foot to modulate car position in constant radius turns,
not the steering wheel. In a steady state turn, once you have established the
correct steering input to maintain that arc, lifting the throttle slightly will
let the car tuck in closer to the inside cones. Conversely, slightly increasing
the throttle will push the car out a bit farther to avoid inside cones. It is
much easier to make small corrections in position with slight variations in
the tires' slip angle (that's what you are doing with the throttle) than with
the steering wheel.
• If downshifting is necessary for a corner the shift should be finished, with the clutch back out, BEFORE beginning to turn. Very few people can corner at the car's limit while steering with one hand. Even fewer can shift instantaneously. Shifting while braking will result in fewer "errors" than shifting while cornering. Even more important it allows you to already be applying power when you pass the apex which means you can start accelerating much sooner. Most cars also handle better and give the driver more control while accelerating than while coasting or braking.
• Hands follow the eyes, car follows the hands. 'Nuf said.
• Scan ahead, don't stare. Keep the eyes moving. Looking ahead does not
mean staring ahead. Your eyes must be constantly moving forward and back, and
sometimes left and right. Glance forward, glance back. Your brain can only operate
on the information you give it.
• Don't forget the stuff in between the marked maneuvers! Too often we
think of a course as series of discrete maneuvers. There is typically more to
be gained or lost in the areas that are in between. Pay special attention to
the places where there are no cones.
If you enjoy your autocrossing experience and plan on doing more, the Pikes Peak Sports Car Club runs events all season long. There are usually a few NCMCC members going to them. Go to their website and sign up! Your performance car will appreciate being used for what it was designed for.
How to Adjust Your Handling
OVERSTEER / UNDERSTEER CORRECTIONS
|
Understeer Corrections Push, plowing, front tires slide out first. Usually slight understeer is safer. |
Oversteer Corrections Loose, rear tires slide out first. Oversteer can be dangerous, |
| Raise front tire pressure. | Lower front tire pressure. |
| Lower rear tire pressure. | Raise rear tire pressure. |
| Soften front shocks. | Stiffen front shocks. |
| Stiffen rear shocks. | Soften rear shocks. |
| Lower front end. | Raise front end. |
| Raise rear end. | Lower rear end. |
| Widen front track. | Reduce rear track. |
| Install shorter front tires. | Install taller front tires. |
| Install taller rear tires. | Install shorter rear tires. |
| Install wider front tires. | Install narrower front tires. |
| Install narrower rear tires. | Install wider rear tires. |
| Soften front sway bar. | Stiffen front sway bar. |
| Stiffen rear sway bar. | Soften rear sway bar. |
| More front toe out. | More front toe in. |
| Reduce rear toe in slightly. | Increase rear toe in. |
| Increase front negative camber. | Reduce front negative camber. |
| Increase positive caster. | Reduce positive caster. |
| Soften front springs. | Stiffen front springs. |
| Stiffen rear springs. | Soften rear springs. |
| May need more front suspension travel. | May need more rear suspension travel. |
| Install wider front wheels. | Install wider rear wheels. |
| Use softer front compound if possible. | Use harder front compound if possible. |
| Use harder rear compound if possible. | Use softer rear compound if possible. |
| Remove weight from front of vehicle. | Add weight to front of vehicle. |
| Add weight to rear of vehicle. | Remove weight from rear of vehicle. |
| Drive a different line. | Driver may be going in too deep. |
| Use weight transfer to your advantage. | Driver may be getting on the throttle to early. |
| High Speed. Increase front wing downforce. | High Speed. Increase rear wing downforce. |
| Too much front brake. | Too much rear brake. |
| Vehicle is TWITCHY at limit and hard to keep ahead of in the steering department: | Vehicle slides and is easy to drive at limit but does not corner to full potential: |
| Lower front and rear tire pressures slightly. | Raise front and rear tire pressures slightly. |
| Suspension may be too stiff. | Suspension may be too soft. |
| Shocks may be set too firm. | Shocks may be too soft. |
| Tires may be old or hard. | Roll centers may be too high. |
| Vehicle may not have enough suspension travel. | Lower vehicle. |
| Vehicle may have a toe problem front or rear. | Tires may be too hard. |
| Increase negative camber front and rear if possible. | Widen track front & rear. |
A properly set up vehicle will usually push slightly on corner entry, be fairly neutral at the apex (STEADY STATE) and exhibit slight power oversteer on corner exit. Tight courses at your own risk, we listed them to make your racing safer and your road car safer.
Air Pressure for Competition Tires
The table below suggests tire inflation pressures to be used during competition. Tires should be reset to normal inflation pressures when returned to the street. These recommendations should be used as a starting point. Pressure can be adjusted to match the driver's preferences. Adjust pressure in 2 lb. increments.
| Position | Pressure | |
| Front Wheel Drive | Front Rear | 35-45 psi 30-40 psi |
| Front Engine/Rear Drive | Front Rear | 35-45 psi 30-40 psi |
| Rear Engine/Rear Drive | Front Rear | 35-45 psi 35-40psi |
When racing on D.O.T. approved tires air pressure is a major consideration in tuning the handling of your car, especially in cases where suspension adjustments are limited. The chart below shows some of the changes you can make to change the balance of the car.
| Guide To High Performance Handling | ||
|---|---|---|
| Adjustments | Decrease Understeer | Decrease Oversteer |
| Front Tire Pressure | Higher | Lower |
| Rear Tire Pressure | Lower | Higher |
| Front Tire Section | Larger | Smaller |
| Rear Tire Section | Smaller | Larger |
| Front Wheel Camber | More Negative | More Positive |
| Rear Wheel Camber | More Positive | More Negative |
| Front Wheel Toe | Toward Toe-Out | Toward Toe-In |
| Rear Wheel Toe | Toward Toe-In | Toward Toe-Out |
| Front Wheel Caster | More Positive | More Negative |
| Front Springs | Soften | Stiffen |
| Rear Springs | Stiffen | Soften |
| Front Anti-sway Bar | Soften (Thinner) | Stiffen (Thicken) |
| Rear Anti-sway Bar | Stiffen (Thicker) | Soften (Thinner) |
| Weight Distribution | More Rearward | More Forward |
To get even tire wear when using D.O.T. tires you must be very careful not to use too low of a tire pressure. The Hoosier Radials can wear unevenly if underflated and seem to work best at much higher pressures, such as the mid 30s to as high as 50 psi. Underinflation will cause a thin ring of wear at the very edge of the tread. The best results on the Hoosiers seem to come when they are properly inflated, on fairly wide wheels, and with a good amount of negative camber. If properly inflated, these problems can be avoided. Probably the biggest adjustment you can make to improve tire wear is the driver. Avoided sliding the tires, locking up the wheels under braking and drive as smooth as possible.
TIRE PRESSURES IN THE RAIN
For both autocross and road racing, increase tire pressures 6-10 psi from what you would normally run in dry conditions. Hydroplaning occurs when a wedge of water develops between the tire and road surface. This wedge can actually lift the tire off the road and eliminate traction. Increasing the pressure rounds the profile of the tire by decreasing the deflection of the tire. This results in a smaller contact patch - narrower and shorter. It also helps keep the grooves in the tread open so they can channel the water out from under the tire.
Setting up a Competition Alignment for better lap
times